
It's Tuesday! With warmer weather bound to show up soon, I made Leah a little summer top!

I think I got the idea for this shirt at a store, but I can't remember where....
Here's the tutorial:
To make the pattern, I used a t-shirt that fit Leah:

I drew down the side, neck and shoulders. Then I folded the sleeve in for the armhole:

I straightened out the side, drew the length I wanted, added seam allowance just to the shoulder and side seams, and was left with this:

I also drew the lower neckline for the front (about 1" lower at center):

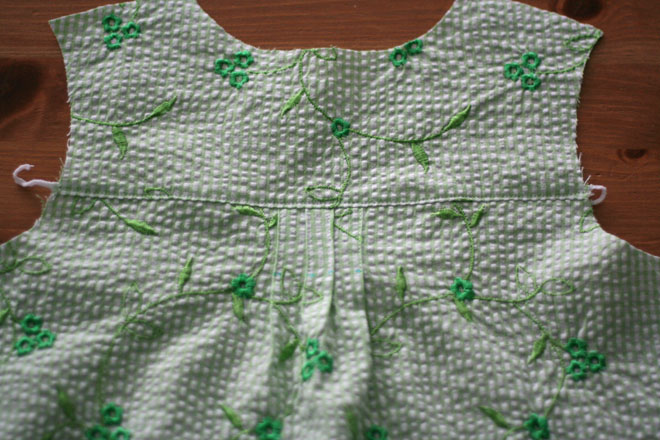
I wanted a back yoke, so I traced the pattern until about 3" from the shoulder. I drew a line straight across and then added seam allowance:

Then I traced the rest of the pattern piece and added seam allowance to the top:

Pattern pieces done:

Time to cut everything out!
I wanted 4 pleats in the back, so I cut the bottom back piece 1" from the fold:

Same for the front, 1" from fold for pleats:

Next, I cut the back yoke on the fold and also cut some 1 3/4" strips for bias tape (not shown):

I also cut a 2" by 19" piece for the ruffle and a 3/4" by 14" piece for the button tabs:

Time to mark pleats! For the back, first I marked the center. Then to the right from center, 1/4", 3/4", 1 1/4", and 1 3/4". Then repeated to the left.
For the front, I marked center, then 1", 1 1/2", 2", and 2 1/2" on both sides of center.
Looks kind of like that:

Then I matched the second mark to the third, and the fourth to the fifth on both sides of center. I sewed the pleats down about 4 1/2" in the front and about 1 1/2" in the back:

I cut 4 1/2" down the center for the opening:

Next, I sewed the back piece to the back yoke, finishing the seam and topstitching it:
and also sewed the shoulder seams:

Using the bias tape I made from the strips I cut, I finished the armholes:

and sewed the side seams:

I ironed the piece for the ruffle in half, the long way:

and ironed the strip for the button tabs with the long edges meeting in the middle:

and then in half, to make a skinny strip:

Topstitched this close to the open edge and cut it into 4- 3" pieces:

Next, I ran a gathering stitch for the ruffle, and pinned it around the front opening. I basted it down and then placed my button tabs evenly, 1/2" from the top and then every 1 1/4" after that:

After I sewed the ruffle and button tabs on, I sewed the bias tape around the front opening too:

and then around the neck:

I folded the button tabs over and sewed them down:

Finally, I hemmed the bottom and added some 3/8" buttons!
Shirt finished:

We ran out this morning to grab some sunshine for some pictures!

Perfect for Summer!


Sweet back pleats:

A perfect Summer shirt, for warmer days to come!

Any questions? Let me know! :)
Linked to:
Very cute!!! Great job on this adorable top!
ReplyDeleteThis is so incredibly adorable! Thank you so much for sharing. I just found your site and have loved wandering through your posts. Can't wait to see more of your talent!
ReplyDeletep.s. My little girl has got to have one of these... or two! : ) Wouldn't it be super cute to add a little length and sleeves to make a tunic style? Thank you again.
This is such a pretty top!!! I linked to your tutorial on Craft Gossip Sewing:
ReplyDeletehttp://sewing.craftgossip.com/tutorial-spring-top-with-ruffled-button-placket/2011/04/06/
Warm regards,
Anne
adorable!! great job on the shirt, I love the pleating
ReplyDeletepretty top!
ReplyDeleteThis is so cute! And an adorable model, too ;-)
ReplyDeleteIt's a very nice tutorial!!
ReplyDeleteThank YOU:)
It's sooo cute! Thank you very much for the tutorial.
ReplyDeleteVery Cute! I wil have to try this! I'm a newbie to sewing, hopefully I can make it work! lol
ReplyDeleteThanks for the tutorial!!
I just made this shirt in an adult size - for myself. I love it!! I omitted the button placket, but only because this a test run and I wanted to put as little effort as possible until I knew that the basic shape would work on my figure. Check it out:
ReplyDeletehttp://sewing.craftgossip.com/from-my-studio-last-week-april-12-2011/2011/04/12/
--Anne
I want to say thank you for this tutorial. I've made 4 test shirts this week trying to find the right style to match a twirl skirt for my 3 yo Easter outfit. I knew when I found this shirt that this was the one (found you via freeneedle). I made it out of the matching fabric without testing it first and I was correct! My daughter tried it on with the skirt this morning and it's perfect. I didn't finish the neck and hem (I don't want her thinking she can wear it before Easter), but I'll share pictures after Easter. Thank you again! It was a great tutorial and so easy to do for this new sewer!
ReplyDeleteEllen-
ReplyDeleteThat is so wonderful! I am so glad that this helped you! I would LOVE to see pictures after Easter! You totally made my day! :)
Truely adorable!! Thanks for auditioning for OMTWI!!
ReplyDeleteit's awesome..great tutorial and pretty green top i will make one soon
ReplyDeleteGreat pattern! I really love your method for instruction. Makes this pattern easy to follow.
ReplyDeleteSo cute! I featured this tutorial in a kids summer clothing sewing tutorials post on my blog, The Handmade Experiment http://wp.me/pkcUM-Hr.
ReplyDeleteThanks!
Hi Misty! Just wanted to let you know I finally had a chance to make this top. Thanks again for such a cute idea. I blogged about it here: http://lifeonhackberryroad.blogspot.com/2011/06/adorable-shirt-from-pillowcase.html
ReplyDeleteand linked the tutorial back to you. Please let me know if that isn't okay! Have a great day.
Miranda
omg, this is so cute!!! :) we share part of the same nick. :D i'm sharing this tute with my forum. hoping to make some for my girls too. btw, is the fabric u used knit or woven? thanks!!
ReplyDeletemistyeiz